WordPress Plugin:

It is a set of one or more functions, written in the PHP scripting language, that adds a specific set of features to the WordPress.

Installing Plugins

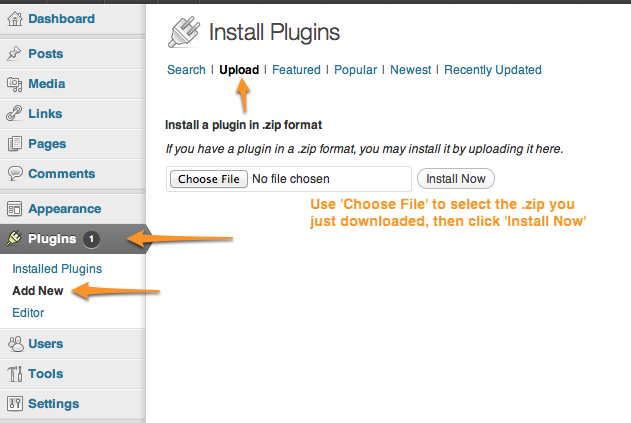
Automatic Plugin Installation

1. Go to Plugins Menu. Click on Add New. 2. Search plugin name which you want to add in wordpress search plugin box or dounload plugin as a zip and upload it from upload link. 3. Select the WordPress Plugin which you want to install. 4. Click on Install Now button to install the plugin. 5. The resulting installation screen will display the installation is successful or not. And note any problems during the install. 6. If installation is successful then click on Activate Plugin link to activate it, or click on Return to Plugin Installer link for further actions.

Manual Plugin Installation

1. Download your WordPress Plugin to your system. 2. If downloaded plugin is a zip archive format, extract the plugin folder to your system. 3. Upload the plugin folder to the wp-content/plugins folder in your wordpress directory. 4. Go to Plugins screen in wp-admin and find the newly uploaded plugin in the list of plugins. 5. Click on Activate link to activate it.

Creating a Plugin

First step of creating plugin is to think about what the plugin will do, and give a name to your plugin. Plugin name should be unique. The next step is to create a PHP file of plugin and give it a name that derived from your plugin name. For instance, if your plugin will be “Super Functionality”, you might call your PHP file super-functionality.php. Try to choose a unique name. For install your plugin, Put pthis PHP file into the wordpress plugins directory(wp-content/plugins). So no two plugins can have the same PHP file name. Another option is to split plugin into multiple files. Your wordpress plugin must have at least one PHP file, it can also contain files such as CSS, JavaScript, language and image files. Make a directories for these files in main plugin directory and put all these files into their respected directories.